By: Reid Abbott, Regional Agronomist
Poor or delayed planting conditions, flooded fields, untimely fertilizer and pesticide applications, and
late harvests are just some of the challenges that growers face. While it is tempting to throw
up your hands and move on, there are some lessons to be learned to be better prepared
when Mother Nature throws a wrench in our plans. One effective way to stay ahead of changing
conditions throughout a growing season is to enroll in a tissue sampling program. But what is crop tissue sampling? And how can it help your crops? We’ve updated this blog post in 2023 to help you conduct crop tissue sampling easily and accurately.
What is Crop Tissue Sampling?
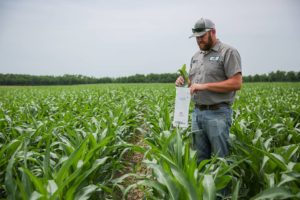
First, what is crop tissue sampling? Crop tissue sampling means taking a few leaves from your crop and studying the leaves in order to see what nutrients are present or deficient. Crop tissue sampling can help your crops in a variety of ways. It’s important to conduct crop tissue properly in order to get accurate results. In this blog post, we’ll discuss what crop tissue sampling is in more detail and how to conduct crop tissue sampling properly.
Talk to our agronomists about soil and tissue sampling today
How Crop Tissue Sampling Helps Crops
While tissue sampling should never replace a sound soil sampling program, routine sampling throughout a growing season can very successfully indicate trends in plant health and nutrient efficiency as a crop is dealing with its environment.
Detecting Nutrient Deficiencies
Nutrient deficiencies can dramatically limit a grower’s yield potential in many cases. But “hidden hunger” (a term we use for nutrient deficiencies that show little to no outward symptoms) can be yield limiting as well. Tissue sampling can catch those deficiencies early in a plant’s life cycle while there is still time to take corrective action.
Even though tissue testing generally looks strictly at nutrient levels, when paired with proper field scouting and an understanding of nutrient relationships, crop tissue sampling can help a grower radically improve their ability to recognize all kinds of variables that are limiting their crop.
Growers, in general, do not intentionally under-fertilize their crops. So, in many cases, deficiencies in one or more nutrients on a tissue test can be indicative of a larger problem. For example, some tissue tests come back low in nitrogen when adequate nitrogen was applied to start the season. This leaves farmers scrambling to figure out how to rescue-apply nitrogen to crops that had endured heavy leaching. But, what about other leachable nutrients like boron, sulfur, and in some cases potassium?
To the untrained eye, some of these deficiencies could have even been mistaken for nitrogen deficiency or maybe they did not drop below the threshold of hidden hunger. A crop tissue test can provide that answer and allow a grower to better stay ahead of those needs amid challenging environmental hurdles. Compaction, drought, disease, insect and weed pressure, to name a few, can all contribute heavily to a crop’s efficient (or inefficient) use of applied nutrients. Tissue testing can be another tool in your toolbox to successfully navigate all of the trials your crop must undergo to reach physiological maturity.
How to Conduct a Proper Crop Tissue Test
For all of the benefits crop tissue sampling can bring to an operation, careful planning and execution must be taken to be able to rely on the results. Unfortunately, despite popular theory, there is more to tissue sampling than throwing some leaves in a bag and waiting for 3-5 days for the results. One of the most common mistakes is taking the wrong plant part for the designated growth stage or misreporting the crop’s growth stage altogether to the lab. Labs report nutrient levels by what is sufficient for that crop at a particular point in that plant’s growth cycle.
For example, you can imagine the sufficiency range for many nutrients in vegetative growth stages differs from that of reproductive growth stages. Reporting the proper growth stage and collecting the correct plant part for that respective growth stage is imperative to getting accurate results. Of course, as with any sample work, collecting a representative sample of a given area is many times overlooked or lackadaisically done. Questionable or unexplainable results are often the result of statistical outliers that played too big of a role in the average.
In addition, care should be exercised when
considering the condition of the samples received at the lab. A few basic hints:
• Use paper bags to hold the plant tissue instead of sealed plastic to avoid mildew
• Avoid keeping samples on the dashboard of a pickup or even in the toolbox where they risk drying out
• Do not take samples too soon after a foliar application has occurred to avoid skewing the results. Instead give the plant time to absorb and metabolize the supplied nutrients before measuring the effect they had on the tissue levels.
A Part of the Plan
After a proper soil test and solid fertility recommendation, crop tissue testing is the next step a grower can take to improve nutrient management and efficiency on their operation. While tissue samples only represent a single point in time during a growing season, when taken at multiple intervals, trends can be recorded and multiple angles of crop health diagnostics can be investigated. When planning your nutrient management strategy, investigate the possibility of deploying tissue testing on your operation with your local retailer or crop advisor.
